Mesh Renderer
Switch to ScriptingThe MeshThe main graphics primitive of Unity. Meshes make up a large part of your 3D worlds. Unity supports triangulated or Quadrangulated polygon meshes. Nurbs, Nurms, Subdiv surfaces must be converted to polygons. More info
See in Glossary Renderer takes the geometry from the Mesh FilterA mesh component that takes a mesh from your assets and passes it to the Mesh Renderer for rendering on the screen. More info
See in Glossary and renders it at the position defined by the GameObjectThe fundamental object in Unity scenes, which can represent characters, props, scenery, cameras, waypoints, and more. A GameObject’s functionality is defined by the Components attached to it. More info
See in Glossary’s Transform component.
This page contains the following sections:
Exposing advanced settings
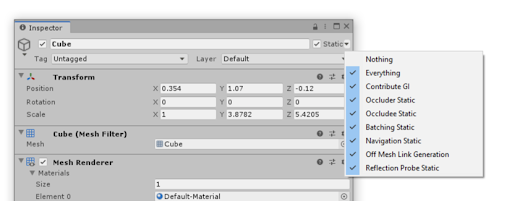
Some properties in the Mesh Renderer component are hidden by default, until you mark the GameObject as Static. A static GameObject cannot move at run time. To expose these properties, enable the Contribute GI Static checkbox, or enable the Contribute Global Illumination checkbox in the Lighting section. You then need to make sure Receive Global Illumination is set to LightmapsA pre-rendered texture that contains the effects of light sources on static objects in the scene. Lightmaps are overlaid on top of scene geometry to create the effect of lighting. More info
See in Glossary.
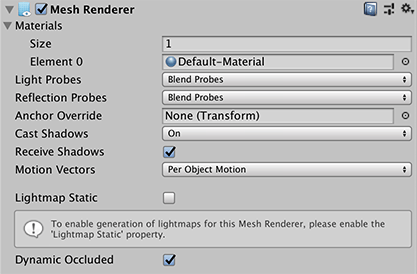
Materials
The Materials section in the Mesh Renderer InspectorA Unity window that displays information about the currently selected GameObject, Asset or Project Settings, alowing you to inspect and edit the values. More info
See in Glossary lists all the Materials that the Mesh Renderer is using. Meshes imported from 3D modelling software can use multiple Materials, and each sub-Mesh uses one MaterialAn asset that defines how a surface should be rendered, by including references to the Textures it uses, tiling information, Color tints and more. The available options for a Material depend on which Shader the Material is using. More info
See in Glossary from the list.
If a Mesh contains more Materials than sub-Meshes, Unity renders the last sub-Mesh with each of the remaining Materials, one on top of the next. This allows you to set up multi-pass renderingThe process of drawing graphics to the screen (or to a render texture). By default, the main camera in Unity renders its view to the screen. More info
See in Glossary on that sub-Mesh. However, this can impact the performance at run time. Fully opaque Materials overwrite the previous layers, which causes a decrease in performance with no advantage.
| Property: | Function: |
|---|---|
| Size | Specify the number of Materials in the Mesh Renderer. If you decrease the size of the list of Materials, Unity deletes the elements at the end of the list. |
| Element | A list of the Materials in the Mesh Renderer, in numeric order. The first element is always named Element 0. |
Lighting
The Lighting section contains properties for how this Mesh Renderer interacts with lighting in Unity.
| Property: | Function: |
|---|---|
| Cast Shadows | Specify if and how the Mesh casts shadows when a suitable Light shines on it. |
| On | The Mesh casts a shadow when a shadow-casting Light shines on it. |
| Off | The Mesh does not cast shadows. |
| Two Sided | The Mesh casts two-sided shadows from either side. EnlightenThe lighting system by Geomerics used in Unity for computing global illumination (GI). More info See in Glossary and the Progressive LightmapperA tool in Unity that bakes lightmaps according to the arrangement of lights and geometry in your scene. More info See in Glossary do not support two-sided shadows. |
| Shadows Only | Shadows from the Mesh are visible, but not the Mesh itself. |
| Receive Shadows | Enable this option to make the Mesh display any shadows that are cast upon it. This is only supported when using the Progressive Lightmapper. |
| Contribute Global Illumination | Enable this checkbox to include the GameObject in Global Illumination computations. When enabled, Unity also enables the Static checkbox at the top of the GameObject’s Inspector, with the property Contribute Global Illumination enabled. Enable this property to make the Receive Global Illumination property appear. |
| Receive Global Illumination | If you select Lightmaps, the Lightmapping properties appear. You can only configure this option if you’ve enabled Contribute Global Illumination above. If you do not enable Contribute Global Illumination, the GameObject registers as non-static, the Static checkbox at the top of the inspector doesn’t have a mark, and Receive Global Illumination is grayed out. The GameObject then receives Global Illumination from Light Probes. |
| Prioritize illumination | Enable this property to always include this GameObject in lighting calculations. This is useful for affecting GameObjects that are far away from this emissive GameObject which, for performance reasons, wouldn’t normally be affected. By default this property is hidden. To expose it, enable the Static checkbox. |
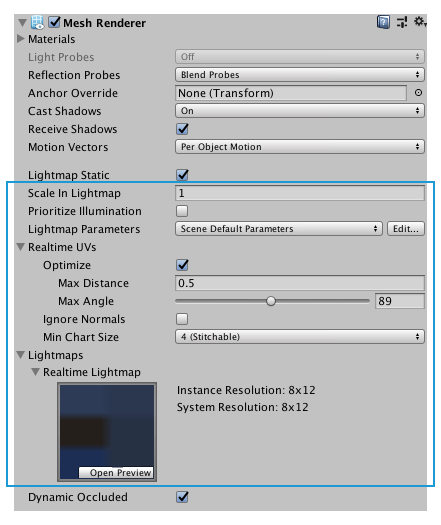
Lightmapping
If you have enabled the properties mentioned in the Exposing advanced settings) section, the Lightmapping section appears. If you also enable Realtime Global Illumination (menu: Window > Rendering > Lighting Settings), additional properties appear in the Lightmapping section, including UV properties, as shown here:

| Property: | Function: |
|---|---|
| Scale in Lightmap | Specify the relative size of the GameObject’s UVs within a lightmap. A value of 0 results in the GameObject not being lightmapped, but it still contributes to lighting other GameObjects in the Scene. A value greater than 1.0 increases the number of pixels (the lightmap resolution) used for this GameObject, while a value less than 1.0 decreases it. You can use this property to optimize lightmaps so that important and detailed areas are more accurately lit. For example, an isolated building with flat, dark walls uses a low lightmap scale (less than 1.0) while a collection of colourful motorcycles displayed close together requires a high scale value. |
| Stitch Seams | When enabled, Enlighten identifies the pair of edges that should be stitched together and produces radiosity which is as smooth as possible across the seam. This parameter applies only to straight edges which run horizontally or vertically along chart boundaries in the atlas. This is designed to work with rectangles which are axis-aligned in UV space. |
| Lightmap Parameters | Choose or create a set of Lightmap Parameters for this GameObject. |
| Optimize Realtime UVs | Specify whether the authored Mesh UVs are optimized for Realtime Global Illumination or not. When enabled, Unity merges, scales and packs the authored UVs for optimization purposes. When disabled, Unity scales and packs, but does not merge, the authored UVs. The optimization sometimes makes mistakes about discontinuities in the original UV mapping. For example, an intentionally sharp edge may be misinterpreted as a continuous surface. |
| Max Distance | Specify the maximum worldspace distance to be used for UV chart simplification. If charts are within this distance, Unity simplifies them. |
| Max Angle | Specify the maximum angle in degrees between faces sharing a UV edge. If the angle between the faces is below this value, Unity simplifies the UV charts. |
| Ignore Normals | Enable this option to prevent Unity from splitting the UV charts during the precompute process for Realtime Global Illumination lighting. |
| Min Chart Size | Specify the minimum texel size used for a UV chart. If stitching is required, a value of 4 creates a chart of 4x4 texels to store lighting and directionality. If stitching is not required, a value of 2 reduces the texel density and provides better lighting build times and game performance. |
When you’ve baked your lighting (menu: Window > Rendering > Lighting Settings > Generate Lighting ), the Inspector window shows the lightmaps in the Scene that the Renderer components use. Here, you can read relevant information about the Baked Lightmap and the Realtime Lightmap, if applicable.
Probes
The Probes section contains properties for Light Probes in your SceneA Scene contains the environments and menus of your game. Think of each unique Scene file as a unique level. In each Scene, you place your environments, obstacles, and decorations, essentially designing and building your game in pieces. More info
See in Glossary.
| Property: | Function: |
|---|---|
| Light ProbesLight probes store information about how light passes through space in your scene. A collection of light probes arranged within a given space can improve lighting on moving objects and static LOD scenery within that space. More info See in Glossary |
The probe-based lighting interpolation mode. A Mesh receives light from the Light Probe system depending on the value you set here. Unity uses a single point for the Mesh’s notional position probe interpolation. By default, this is the centre of the Mesh’s bounding box, but you can change this by dragging a Transform to the Anchor Override property. By default, a probe-lit Renderer receives lighting from a single Light Probe that is interpolated from the surrounding Light Probes in the Scene. Because of this, GameObjects have constant ambient lighting across the surface. The Ambient Lighting contains a rotational gradient because it is using spherical harmonics, but it lacks a spatial gradient. This is more noticeable on larger GameObjects or Particle Systems. The lighting across the GameObject matches the lighting at the anchor point, and if the GameObject straddles a lighting gradient, parts of the GameObject look incorrect. To prevent this, set the Light Probes property to Use Proxy Volume, with an additional Light Probe Proxy VolumeA component that allows you to use more lighting information for large dynamic GameObjects that cannot use baked lightmaps (for example, large Particle Systems or skinned Meshes). More info See in Glossary component. This generates a 3D grid of interpolated Light Probes inside a bounding volume. You can edit the Light Probe Group grid through the Inspector window. Unity uses spherical harmonics as a memory-efficient method to store light data. Storage of light data through spherical harmonics produces coefficients that get converted into 3D Textures. Unity samples these 3D Textures at render time to compute the contribution to the diffuse ambient lighting. This adds a spatial gradient to probe-lit GameObjects. For more information, see Light Probes. |
| Off | The Renderer doesn’t use any interpolated Light Probes. |
| Blend Probes | The Renderer uses one interpolated Light Probe. This is the default option. |
| Use Proxy Volume | The Renderer uses a 3D grid of interpolated Light Probes. |
| Custom Provided | The Renderer extracts light probe shaderA small script that contains the mathematical calculations and algorithms for calculating the Color of each pixel rendered, based on the lighting input and the Material configuration. More info See in Glossary uniform values from the MaterialPropertyBlock. |
| Proxy Volume Override | Set a reference to another GameObject that has a Light Probe Proxy Volume component. This property is only visible when Light Probes is set to Use Proxy Volume. |
| Reflection ProbesA rendering component that captures a spherical view of its surroundings in all directions, rather like a camera. The captured image is then stored as a Cubemap that can be used by objects with reflective materials. More info See in Glossary |
Specify how the GameObject is affected by reflections in the Scene. You cannot disable this property in deferred rendering modes. A Mesh can receive reflections from the Reflection Probe system depending on the value you set here. Unity uses a single point for the Mesh’s notional position probe interpolation. By default, this is the center of the Mesh’s bounding box, but you can change this by dragging a Transform to the Anchor Override property. |
| Off | Disables Reflection probes. Unity uses a skyboxA special type of Material used to represent skies. Usually six-sided. More info See in Glossary for reflection. |
| Blend Probes | Enables Reflection probes. Blending occurs only between probes. This is useful in indoor environments where the character may transition between areas with different lighting settings. This is because to maintain realistic lighting, Unity has to blend the light data of two or more reflection probes. The Renderer uses default reflection if there are no reflection probes nearby, but no blending between default reflection and probe happens. |
| Blend Probes and Skybox | Enables Reflection probes. Blending occurs between probes or probes and default reflection. This is useful for outdoor environments. |
| Simple | Enables Reflection probes, but no blending occurs between probes when there are two overlapping volumes. |
| Anchor Override | Set the Transform that Unity uses to determine the interpolationThe estimation of values that determine the shape of an animation curve between two keys. More info See in Glossary position when using the Light Probe or Reflection Probe systems. For example, this can help when a GameObject contains two adjoining Meshes. Since each Mesh has a separate bounding box, Unity lights the Meshes consistently at the same anchor point. Otherwise, Unity lights the area where the two join together discontinuously. |
Additional Settings
The Additional Settings contain additional properties for this Mesh Renderer. |
| Property: | Function: |
|---|---|
| Motion Vectors | When enabled, the mesh has motion vectors rendered into the CameraA component which creates an image of a particular viewpoint in your scene. The output is either drawn to the screen or captured as a texture. More info See in Glossary motion vector Texture. For more information, see Renderer.motionVectorGenerationMode in the Scripting API reference documentation. |
| Dynamic Occlusion | Enable this checkbox if you want Unity to perform occlusion cullingA Unity feature that disables rendering of objects when they are not currently seen by the camera because they are obscured (occluded) by other objects. More info See in Glossary for this GameObject even if it is not marked as Static. |
- 2019–11–08
Did you find this page useful? Please give it a rating: