Avatar Mask window
Switch to ScriptingThere are two ways to define which parts of your animation should be masked:
- By selecting from a Humanoid body map
- By choosing which bones to include or exclude from a Transform hierarchy
Humanoid body selection
If your animation uses a Humanoid AvatarAn interface for retargeting animation from one rig to another. More info
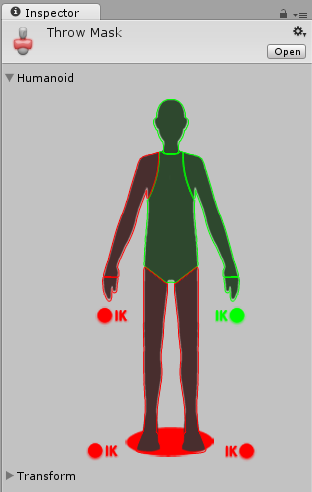
See in Glossary, you can select or deselect portions of the simplified humanoid body diagram to indicate where to mask the animation:

The body diagram groups body parts into these portions:
- Head
- Left Arm
- Right Arm
- Left Hand
- Right Hand
- Left Leg
- Right Leg
- Root (denoted by the “shadow” under the feet)
To include animation from one of these body portions, click the Avatar diagram for that portion until it appears as green. To exclude animation, click the body portion until it appears red. To include or exclude all, double-click the empty space surrounding the Avatar.
You can also toggle Inverse Kinematics__ (IK)__ for hands and feet, which determines whether or not to include IK curves in animation blending.
Transform selection
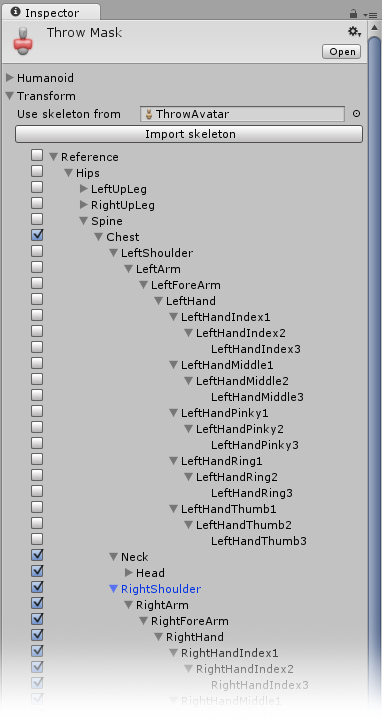
Alternatively, if your animation does not use a Humanoid Avatar, or if you want more detailed control over which individual bones are masked, you can select or deselect portions of the Model’s hierarchy:
- Assign a reference to the Avatar whose transform you would like to mask.
- Click the Import Skeleton button. The hierarchy of the avatar appears in the inspectorA Unity window that displays information about the currently selected GameObject, Asset or Project Settings, alowing you to inspect and edit the values. More info
See in Glossary. - You can check each bone in the hierarchy to use as your mask.

Mask assets can be used in Animator ControllersControls animation through Animation Layers with Animation State Machines and Animation Blend Trees, controlled by Animation Parameters. The same Animator Controller can be referenced by multiple models with Animator components. More info
See in Glossary, when specifying Animation LayersAn Animation Layer contains an Animation State Machine that controls animations of a model or part of it. An example of this is if you have a full-body layer for walking or jumping and a higher layer for upper-body motions such as throwing an object or shooting. The higher layers take precedence for the body parts they control. More info
See in Glossary to apply masking at runtime, or in the import settings of of your animation files to apply masking during to the import animation.
A benefit of using Masks is that they tend to reduce memory overheads since body parts that are not active do not need their associated animation curvesThe curve drawn between keys set for the same animatable property, at different frames or seconds. The position of the tangents and the selected interpolation mode for each key determines the shape of the animation curve. More info
See in Glossary. Also, the unused curves need not be calculated during playback which will tend to reduce the CPU overhead of the animation.
- 2018–04–25 Page amended
Did you find this page useful? Please give it a rating: