Setting up your Project for Vuforia
Setting up your project to develop Vuforia ARAugmented Reality (AR) uses computer graphics or video composited on top of a live video feed to augment the view and create interaction with real and virtual objects.
See in Glossary or MR mobile applications is very similar to the set-up process for building with Unity for a mobile platform. The Unity Installer includes the Vuforia SDK. Follow the instructions for downloading and installing Unity on the InstallingUnity manual page. Vuforia provides a selection of PrefabsAn asset type that allows you to store a GameObject complete with components and properties. The prefab acts as a template from which you can create new object instances in the scene. More info
See in Glossary designed to be dropped into a SceneA Scene contains the environments and menus of your game. Think of each unique Scene file as a unique level. In each Scene, you place your environments, obstacles, and decorations, essentially designing and building your game in pieces. More info
See in Glossary to provide feature functionality to your application. These are all available from inside the Unity Editor.
You should adhere to the same performance considerations as required for developing regular mobile games. For information on optimising for mobile devices, see Unity documentation on mobile optimisation.
To get Vuforia set up with Unity:
- Install the latest version of Unity, and in the Unity component selection section of the installer, select Vuforia Augmented Reality Support, along with either the iOS Build Support or Android Build Support packages.
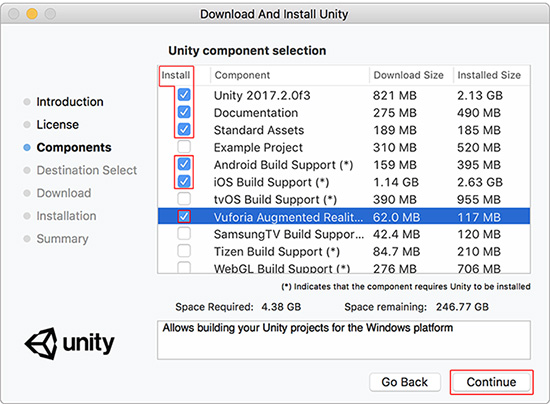
Note: Most AR and MR applications target mobile devices, so the focus of this guide is development for Android and iOS. See guides for enabling build support for Android and iOS devices in the Getting Started documentation for Android and iOSApple’s mobile operating system. More info
See in Glossary.
Create a Vuforia developer account from the Vuforia registration page. This account gives you access to the tools you need to make AR and MR applications with Vuforia in Unity.
If you have not already created a Unity ID, then do so from the Unity registration page. You need a Unity ID to download any packages from the Unity Asset StoreA growing library of free and commercial assets created by Unity and members of the community. Offers a wide variety of assets, from textures, models and animations to whole Project examples, tutorials and Editor extensions. More info
See in Glossary.Open Unity and create a new 3D Project (make sure the 3D option is selected next to the Add Asset Package button). Name your Project, then click the Create project button.

Tip: Download the Vuforia AR+VR Sample package from the Unity Asset Store. This package provides useful example Scenes demonstrating important features. You will not need this for following this guide, but it is useful to have for further learning later.
Activating Vuforia in Unity
To activate Vuforia in your Unity project, access the Player settings from Edit > Project SettingsA broad collection of settings which allow you to configure how Physics, Audio, Networking, Graphics, Input and many other areas of your Project behave. More info
See in Glossary, then select the Player category, and select the tab for the mobile device you are building to. Under the XR Settings panel, enable the Vuforia Augmented Reality Support property.
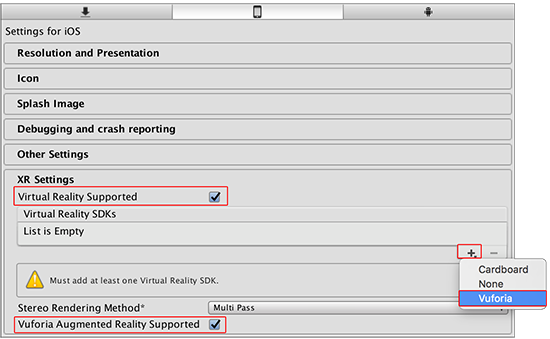
Your Scene now contains two GameObjects: a main CameraA component which creates an image of a particular viewpoint in your scene. The output is either drawn to the screen or captured as a texture. More info
See in Glossary, and a directional light. You need to add a new AR Camera to the Scene in order to enable AR functionality, and you need to delete the current Main Camera GameObject from the Scene.
To delete the Camera GameObject, select it in the Hierarchy window and press the delete key on your keyboard, or right click it and select Delete.
For more information on the individual settings under the XRAn umbrella term encompassing Virtual Reality (VR), Augmented Reality (AR) and Mixed Reality (MR) applications. Devices supporting these forms of interactive applications can be referred to as XR devices. More info
See in Glossary Settings panel, see the Vuforia Platform Configuration page of this manual.
Adding a Vuforia AR Camera and other GameObjects
To add an AR Camera to your scene, go to GameObjectThe fundamental object in Unity scenes, which can represent characters, props, scenery, cameras, waypoints, and more. A GameObject’s functionality is defined by the Components attached to it. More info
See in Glossary > Vuforia > AR Camera.
If this is the first Vuforia GameObject added to your Scene then Unity also prompts to import your Vuforia Assets. Select Import, and Unity imports all necessary Vuforia files into your project.
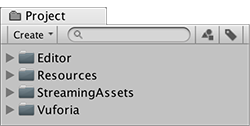
The Project window displays 4 new folders, one of which is called Vuforia. The code and Assets in this folder provide the main AR and MR functionality. The other folders provide sample Scenes, resources, tools, and plugins so that you can develop AR and MR applications for a variety of devices.
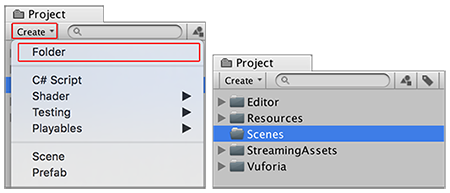
Create a new folder in your project. To do this, navigate to the Project window, click the Create button, and select Folder. Name this new folder Scenes and save a new Scene inside this folder.
This process also adds a new ARCamera GameObject in your Scene hierarchy.
Creating a Vuforia license key
The last step in the setup process is to create a license key from the License Manager section of the Vuforia Developer Portal. You need to enter this into Unity’s Vuforia configuration settings in order to build and test your application with Unity.
Visit the Vuforia Developer Portal and log in (or create a new account). Navigate to the License Manager in the Develop section and click the Get Development Key button to open the Add License Key page.
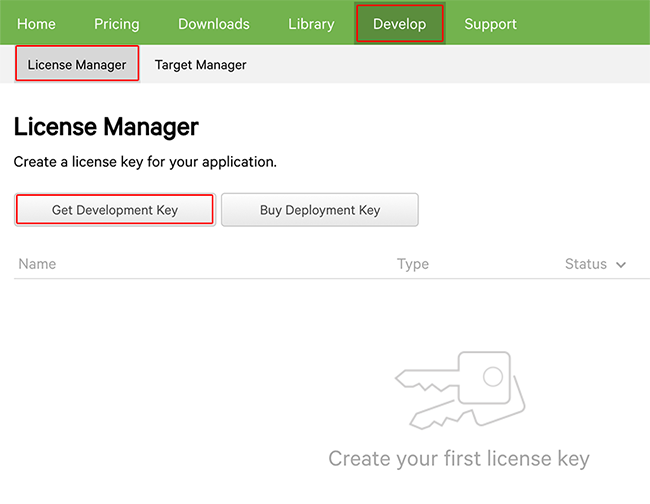
On the Add License Key page, enter a name for your app. Accept the terms and conditions, then click the Confirm button to generate a new license key.
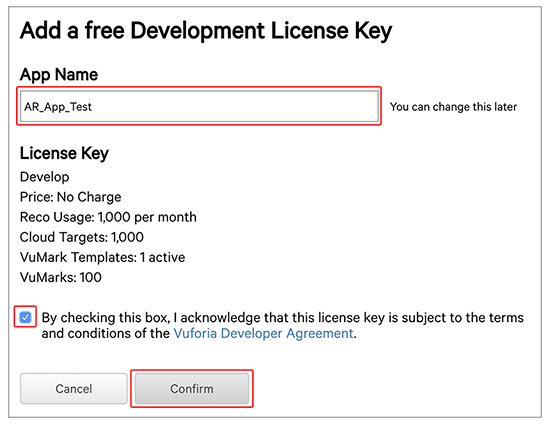
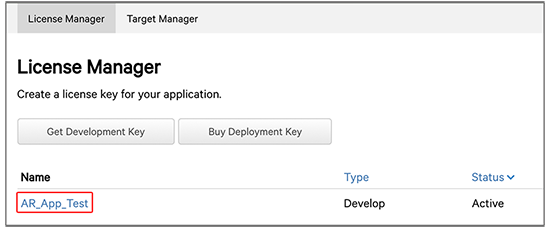
On the next page, agree to the Vuforia Developer conditions (tick the box) and then click the Confirm button. This brings you back to the Licence Manager page where you can see your newly created license in a list where its status is Active. Click on the name of your App to view the license details. This allows you to retrieve your development license key.
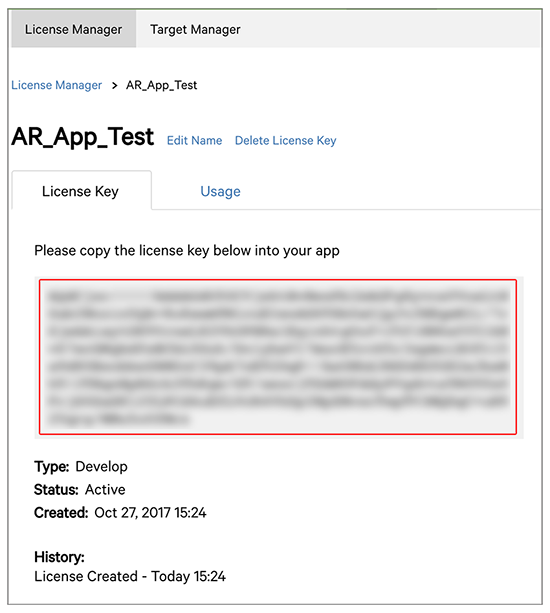
Copy the license key to the clipboard and navigate back to your Unity Project.
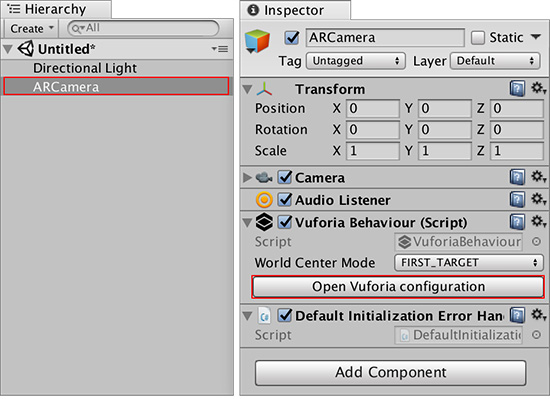
Select the ARCamera GameObject from the Hierarchy window and, in the InspectorA Unity window that displays information about the currently selected GameObject, Asset or Project Settings, alowing you to inspect and edit the values. More info
See in Glossary window, navigate to the the Vuforia Behaviour(Script) component and click the Open Vuforia configuration button.
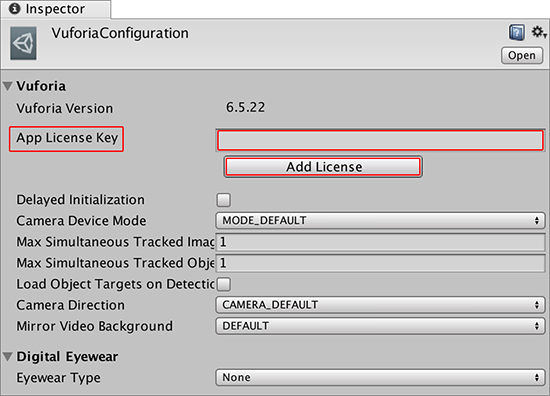
The Inspector window displays a list of Vuforia Configuration options. Paste your Vuforia Development key into the App License Key text box under the Vuforia section and then click the Add License button.
Testing your set-up
To test Vuforia apps in the Unity Editor, you need to have a webcam connected to your PC or laptop. As a final step to make sure Vuforia is now installed properly in your Unity Project, press the Play button to test your Scene. If Vuforia is set up correctly, a video feed from your webcam appears in the Editor Game View.
Now you are ready to set up Image Targets and add AR functionality to your Project.
2018–03–28 Page published
Vuforia documentation updated for Unity XR API in 2017.3
Did you find this page useful? Please give it a rating: