Tilemap Renderer
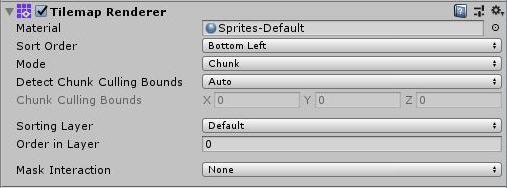
The Tilemap Renderer component is part of the Tilemap GameObject. It controls how TilesA simple class that allows a sprite to be rendered on a Tilemap. More info
See in Glossary set on the TilemapA GameObject that allows you to quickly create 2D levels using tiles and a grid overlay. More info
See in Glossary are rendered.

| Property | Function |
|---|---|
| MaterialAn asset that defines how a surface should be rendered, by including references to the Textures it uses, tiling information, Color tints and more. The available options for a Material depend on which Shader the Material is using. More info See in Glossary |
Define the Material used to render the SpriteA 2D graphic objects. If you are used to working in 3D, Sprites are essentially just standard textures but there are special techniques for combining and managing sprite textures for efficiency and convenience during development. More info See in Glossary texture. |
| Sort Order | Set the direction that Tiles on the selected Tilemap are sorted from. |
| Mode | Set the renderingThe process of drawing graphics to the screen (or to a render texture). By default, the main camera in Unity renders its view to the screen. More info See in Glossary mode of the Renderer. |
| Chunk | The Renderer groups Tiles by location, and batches their Sprites together for rendering. Select this mode for the best rendering performance with Tilemap. |
| Individual | The Renderer renders each Tile individually, taking into account their location and sorting order as well. This mode enables the Sprites on the Tiles to interact with other Renderers in the sceneA Scene contains the environments and menus of your game. Think of each unique Scene file as a unique level. In each Scene, you place your environments, obstacles, and decorations, essentially designing and building your game in pieces. More info See in Glossary or with a Custom Sorting Axis. |
| Detect Chunk Culling Bounds | Determines how the Render detects the boundsThe coordinates that define the bounding volume. Bounds are pre-calculated on import from the Mesh and animations in the model file, and are displayed as a wireframe around the model in the Scene View. See in Glossary used for the culling of Tilemap chunks. These bounds expand the boundary of Tilemap chunks to ensure that oversized Sprites will not be clipped during culling. |
| Auto | The Renderer automatically inspects the Sprites used by the Tiles to determine the expanded culling bounds to use. |
| Manual | The values used to extend the bounds for culling of the Tilemap chunks are manually set instead of with the Editor’s automatic detection. |
| Chunk Culling Bounds (when ‘Manual’ is selected) | Input the values (in Unity units) that the culling bounds are extended by. |
| Sorting Layer | Set the Sorting Layer of the Tilemap. Select an existing Sorting Layer from the drop-down box, or create a new Sorting Layer. |
| Order in Layer | Set the render priority of the Tilemap within its Sorting Layer. Lower numbered layers are rendered first. Higher numbered layers overlap those below. |
| Mask Interaction | Set how the Tilemap Renderer behaves when it interactswith a Sprite MaskA texture which defines which areas of an underlying image to reveal or hide. More info See in Glossary. |
| None | The Tilemap Renderer does not interact with any Sprite Mask in the Scene. This is the default option. |
| Visible Inside Mask | The Tilemap is visible where the Sprite Mask overlays it, but not outside of it. |
| Visible Outside Mask | The Tilemap is visible outside the Sprite Mask, but not inside it. The Sprite Mask hides the sections of the Sprite it overlays. |
- Tilemaps added in 2017.2 NewIn20172
Did you find this page useful? Please give it a rating: