Recording basic animation with an Infinite clip
You can record animation directly to an Animation track. When you record directly to an empty Animation track, you create an Infinite** clip**.
An Infinite clip is a clip that contains basic key animation recorded through the TimelineGeneric term within Unity that refers to all features, windows, editors, and components related to creating, modifying, or reusing cut-scenes, cinematics, and game-play sequences. More info
See in Glossary window. An Infinite clip cannot be positioned, trimmed, or split because it does not have a defined size: it spans the entirety of an Animation track.
Before creating an Infinite clip, you must add an empty Animation track for the GameObjectThe fundamental object in Unity scenes, which can represent characters, props, scenery, cameras, waypoints, and more. A GameObject’s functionality is defined by the Components attached to it. More info
See in Glossary that you want to animate.
In the Track listThe area in the Timeline Editor window where you add, group, and modify tracks. More info
See in Glossary, click the red circular Record button for the empty Animation track to enable Record mode.

When a track is in Record mode, the clip area of the track is drawn in red with the “Recording…” message, and the Record button blinks on and off.

When in Record mode, any modification to an animatable propertyA property belonging to a GameObject, or belonging to a component added to a GameObject, that can have different values over time. More info
See in Glossary of the GameObject sets a key at the location of the Timeline PlayheadThe white marker and line that indicates the exact point in time being previewed in the Timeline Editor window. More info
See in Glossary.
To start creating an animation, move the Timeline Playhead to the location of the first key, and do one of the following:
In the InspectorA Unity window that displays information about the currently selected GameObject, Asset or Project Settings, alowing you to inspect and edit the values. More info
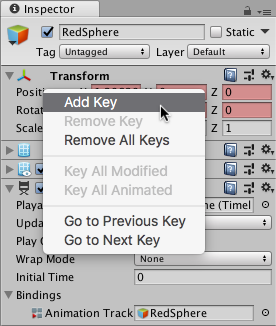
See in Glossary window, right-click the name of the property and choose Add Key. This adds an animation keyThe value of an animatable property, set at a specific point in time. Setting at least two keys for the same property creates an animation. More info
See in Glossary for the property without changing its value. A diamond appears in the infinite clip to show the position of the key.In the Inspector window, change the value of the animatable property of the GameObject. This adds an animation key for the property with its changed value. A diamond appears in the infinite clip.
In the Scene viewAn interactive view into the world you are creating. You use the Scene View to select and position scenery, characters, cameras, lights, and all other types of Game Object. More info
See in Glossary, either move, rotate, or scale the GameObject. This automatically adds a key for the properties you change. A diamond appears in the infinite clip.


Move the playhead to a different position on the Timeline and change the animatable properties of the GameObject. At each position, the Timeline window adds a diamond to the Infinite clip for any changed properties and adds a key to its associated animation curvesThe curve drawn between keys set for the same animatable property, at different frames or seconds. The position of the tangents and the selected interpolation mode for each key determines the shape of the animation curve. More info
See in Glossary.
While in Record mode, you can right-click the name of an animatable property name to perform keying operations such as setting a key without changing its value, jumping to the next or previous keys, and removing keys. For example, to set a key for the position of a GameObject without changing its value, right-click Position and select Add Key from the context menu.

When you finish the animation, click the blinking Record button to disable Record mode.
An Infinite clip appears as a dope sheet in the Timeline window, but you cannot edit the keys in this view. Use the Curves view to edit keys. You can also double-click the Infinite clip and edit the keys with the Animation window.

Save the SceneA Scene contains the environments and menus of your game. Think of each unique Scene file as a unique level. In each Scene, you place your environments, obstacles, and decorations, essentially designing and building your game in pieces. More info
See in Glossary or Project to save the Timeline AssetRefers to the tracks, clips, and recorded animation that comprise a cinematic, cut-scene, game-play sequence, or other effect created with the Timeline Editor window. A Timeline Asset does not include bindings to the GameObjects animated by the Timeline Asset. The bindings to scene GameObjects are stored in the Timeline instance. The Timeline Asset is Project-based. More info
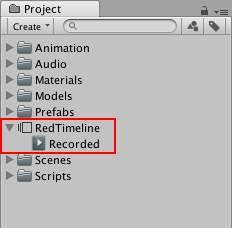
See in Glossary and the Infinite clip. The Timeline window saves the key animation from the Infinite clip as a source asset. The source asset is named “Recorded” and saved as a child of the Timeline Asset in the Project.

For every additional recorded Infinite clip, the Timeline window numbers each clip sequentially, starting at “(1)”. For example, a Timeline Asset with three recorded Infinite clips are named “Recorded”, “Recorded (1)”, and “Recorded (2)”. If you delete a Timeline Asset, its recorded clips are also removed.
- 2019–08–20 Page published
Did you find this page useful? Please give it a rating: