Look Dev
Introduction
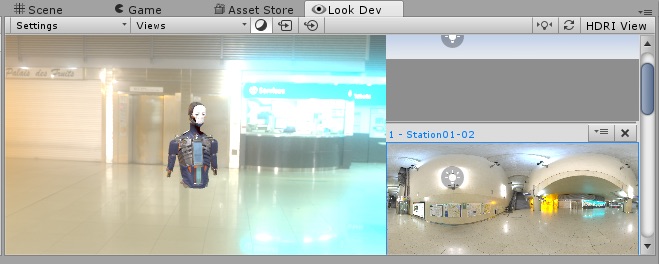
Look Dev is an experimental image-based lighting tool that allows you to check and compare different Assets through a viewer to ensure they are correctly authored for various lighting conditions. It also allows you to debug Assets where required. Load Assets in as PrefabsAn asset type that allows you to store a GameObject complete with components and properties. The prefab acts as a template from which you can create new object instances in the scene. More info
See in Glossary for the best experience.
Asset validation
Asset validation is the process of confirming that Assets are authored correctly so they behave as expected in different lighting environments.
You must validate using HDRIhigh dynamic range image
See in Glossary. HDRI is a type of real-world lighting with incredibly high detail. As such, it offers a perfect lighting rig that would be difficult to create by hand. By using such an accurate lighting environment to test an Asset, you can determine whether the Asset itself or the game’s lighting is causing any poor visual quality.
To learn more about creating HDRI environments, see documentation on the HDRI view.
Look Dev allows you to load two different Assets in two different views. This is useful for comparison. For example, an Art Director can check that a new Asset matches the art direction guidelines of a reference Asset.
Who should use Look Dev?
Look Dev is mainly designed for texture artists, modelling artists, lighting artists, artistic directors, outsourcing managers and anybody else involved in the visual art style of a project.
Rather than using multiple tools to visualise and validate new content, Look Dev allows everybody to visualize the Asset the same way. This means that you can validate the Asset immediately because how it appears in the tool is the same as how it appears in the finished project.
Note that while Look Dev is intended for artists, it is not an artistic tool. It is only intended to be used for Asset visualization and validation.
Initial setup
Before using Look Dev, you need to make sure Unity is set up for the best results:
- Go to the Player settings (menu: Edit > Project SettingsA broad collection of settings which allow you to configure how Physics, Audio, Networking, Graphics, Input and many other areas of your Project behave. More info
See in Glossary, then select the Player category) and navigate to the Other Settings panel. - Set the Rendering PathThe technique Unity uses to render graphics. Choosing a different path affects the performance of your game, and how lighting and shading are calculated. Some paths are more suited to different platforms and hardware than others. More info
See in Glossary to Deferred and the Color Space to Linear.
Look Dev always uses these settings, independently of the Project settings, so changing these settings in your project ensures that what you see in the Look Dev viewer matches what you see in the Scene viewAn interactive view into the world you are creating. You use the Scene View to select and position scenery, characters, cameras, lights, and all other types of Game Object. More info
See in Glossary.
Known issues
When a skyboxA special type of Material used to represent skies. Usually six-sided. More info
See in Glossary uses a cube map with a specular convolution type, it produces a blurry result in smaller renderingThe process of drawing graphics to the screen (or to a render texture). By default, the main camera in Unity renders its view to the screen. More info
See in Glossary windows. Use a large window when using Look Dev in this context.

Did you find this page useful? Please give it a rating: